
Installing Oracle 12.1.0.2 – Part 2: Creating an Instance
In the earlier post we installed the Oracle version 12.1.0.2 (software only) but still didn’t create a database instance. In this post we will go over an installation procedure of a basic CDB database instance. This will be the first instance on that database server (and I’ll explain later why this is important).
For installing and configuring the database instance we will use one of my favorite tools – the DBCA: Database Configuration Assistance. This tool that has been around since Oracle version 9 or 10 (can’t remember which) made creating and removing instances a walk in the park. Before having this great GUI tool, we had to create the database instance manually by running scripts by ourselves. This method of creating database is still available to this day – the DBCA even gives us the option to create the scripts as one of its steps but unless you’re about to create the same database again and again I would not recommend using it.
Another option for using the DBCA is creating database templates. Once you create a database instance you feel comfortable with, you can create a database template out of it for fast deployment. The DBCA will create a backup of your tablespaces and you’ll be able to deploy that database very quickly with different instance names. The DBCA also have a silent (response file) mode which is very good for multiple deployments.
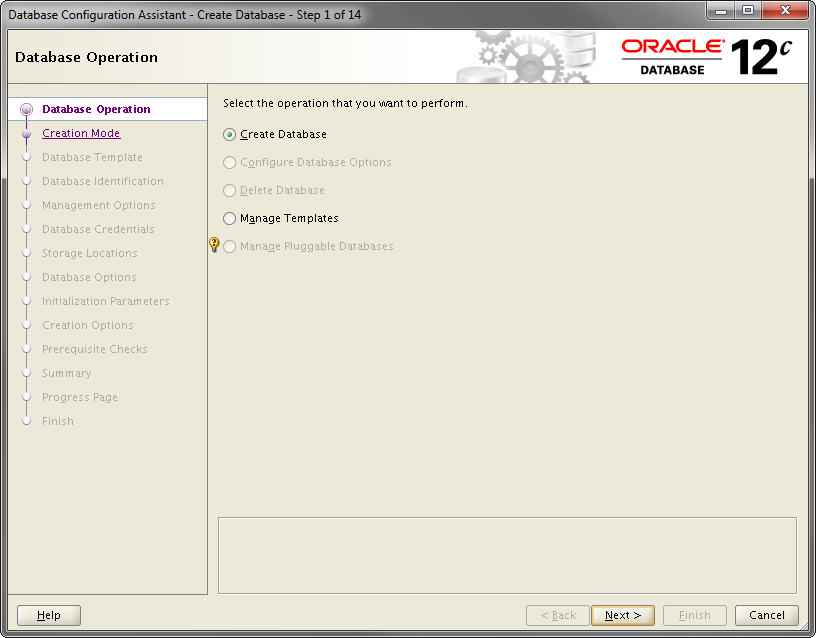
After setting the Oracle Home parameter and having the $ORACLE_HOME/bin in our path, we start DBCA using the dbca command. This will pull up the first screen. On this screen we need to select what we wish to do – in our case, we’re creating a new database instance (and since it’s our first one, this is the only option available there):
On the next screen we have a new option: we can supply some basic configuration settings and install a new instance without much tinkering with configuration or use the custom option to change some advanced settings. If we choose to use the basic settings we’ll need to fill in all the fields: database name, location, language and so on but we will not have any chance to change anything before we begin the installation. This is really good option if you don’t know what you’re doing. I chose to use the advanced (custom) settings.

On the next screen, we are asked what type of database configuration we wish to use. This is the templates I was talking about earlier – Oracle has provided us with 2 pre-configured instances that could be deployed very quickly. The two templates are “General” (OLTP) database and Data Warehouse. Those templates cannot be modified to add or remove more database options but this can be done post installation.
If we want the DBCA to create a fresh installation by running the data dictionary creation script, we will need to choose the “Custom” option in this screen. This will give us the ability to change the installed components. Since it’s using the scripts that are at the Oracle Home, if we installed a patch on that Oracle Home, it will be automatically applied to the new instance. This option might take a while to run.
I chose to create the new instance using the custom configuration – I wanted to see the full process of the installation logs files and see how long it takes.

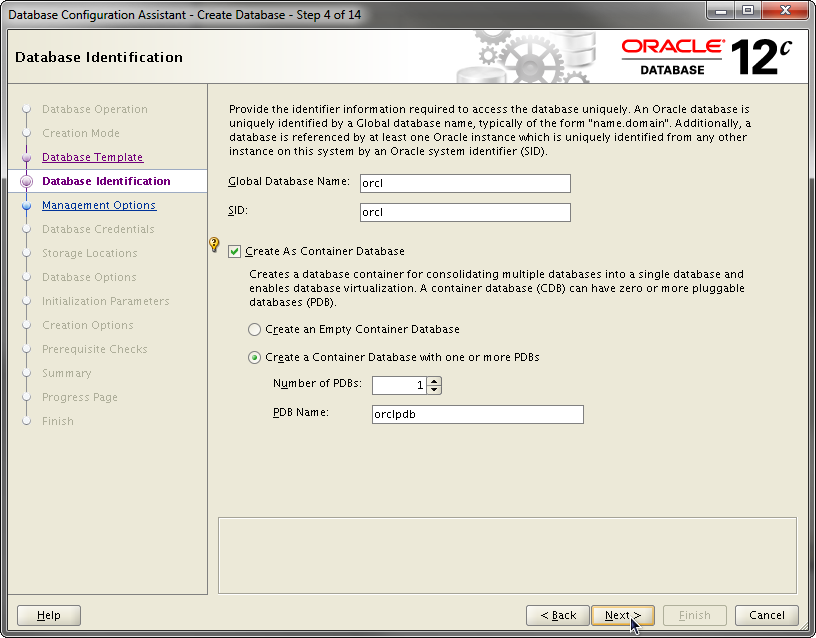
In the next stage we will need to choose a new name for our database instance. We will also need to decide if we’re going to use the new multitenant (pluggable database) setup. This is an important new step since this is when we need to decide whether our database is going to be installed in the old (pre-12c) architecture or use the new one. When choosing not to use the CDB-PDB setup we are giving up some of Oracle 12c most powerful feature (even if we’re not planning on using the pluggable database). In terms of licensing, using the pluggable architecture with a single database does not require an additional licensing (this is explained here, on page 11 and again on page 47 and here).
By using the pluggable setup we will be able to upgrade and patch our database with minimal downtime and we’ll be able to duplicate the database to other environments (such as testing or development) with a single command.
I recommend creating at least one pluggable database and learning how to use it – this is one of the most important improvements in the new version.
The next step is where we need to decide if we want to use Enterprise Manager Express that comes within the database, or configuration of the Oracle Cloud Control. After playing around with the new EM express, I feel that Oracle finally hit the jackpot with it’s managing tool. There is no need for farther installation and configuration and no need for other server side scripts to make the EM run. The web server runs now from within the database and all we need to set up is just a single port to connect to.

In the next step, we need to choose passwords. You can choose a “weak” password but then Oracle will tell us his opinion on us pretty firmly…:)

The next screen is a new screen – until this version, we did not need to have a listener configured when installing the database. Starting Oracle 12, the creation of a new instance requires having a listener available. This is mainly important because of the use of the pluggable databases: in order to connect to a PDB we will need to provide a Service Name and the service name are managed by the listener. Without a listener we will not be able to connect to any user at the PDB level.
If a listener was not started or configured before the installation, a new listener instance will be configured and started for us.

On the next screen, we need to define where to create the data files. I chose to install my database by using OMF (ie, Oracle Managed files – where the database provides the file names) and used a single file location. In addition, I changed the definition for the Fast Recovery Area although I did not yet turned the archiving on. Please note that Oracle let us now choose if we wish to put either data files or archive logs on ASM – in earlier version we had to use the same definition but this is not configurable.

The next step we should choose which components (options) will be installed on our database. Unfortunately, I didn’t really have a choice here and I’m not sure why (but I guess it’s probably related to the fact that the very first version).

On the next screen we are asked to set the password for the Oracle Database Vault. Since not want to exercise the option (yet) so I canceled the option.
The Label Security option left for the benefit of future I plan to post on the subject.
On the next screen we are asked to set the password for the Oracle Database Vault. Since I didn’t want to work with this option (yet), I canceled the option all together.
I left the Label Security option on – I didn’t really need it but I do plan to post something about it in the future.

The next step is a familiar step from earlier versions: in the step we need to define the memory areas (SGA, PGA or automatic memory managements), sizing, language and other initialization parameters. Please note that we still can’t define the Database In Memory option yet – the memory settings for that are defined manually after the database creation.

In this almost last step, we can save the configuration we just did – either by using installation script which we can later run manually or by saving a template setup.
When we finish checking the option we want, we can click Create Database to actually create the database instance.

Just before starting the installation, we are provided with a summary of the installation settings and configuration:

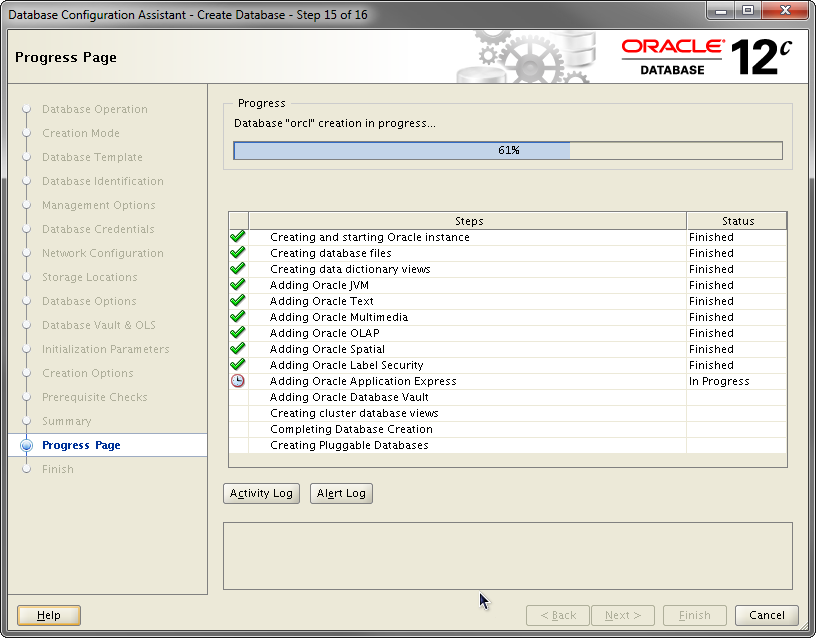
And database installation begins:

At run-time, we can click on the Alert Log button and get a live tail on the alert log file. This can help us understand what is going on during installation and can give us a quick preview to the new structure of the alert log file.

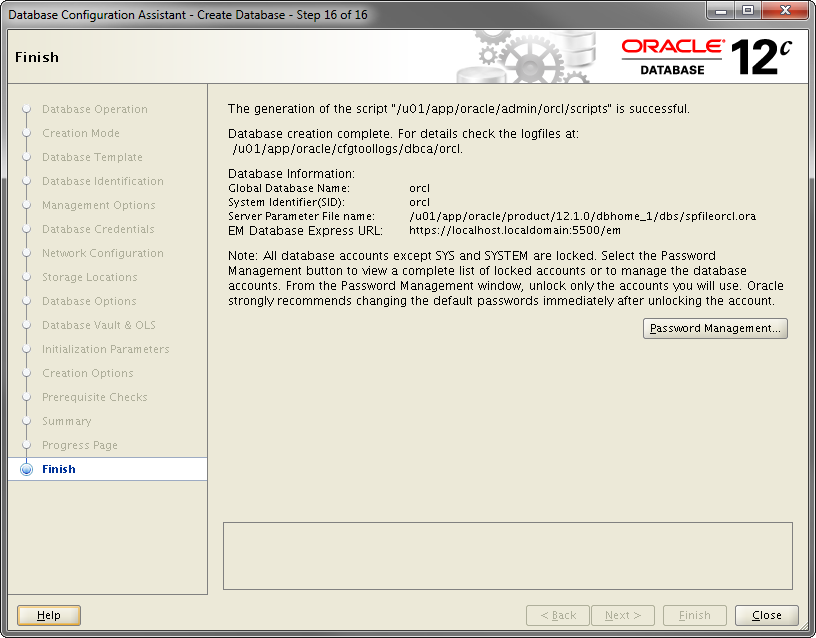
At the end of the process we receive a message that the database was created, but all accounts are locked. To unlock them, we can see the next screen.
To release accounts to connect to them, we can use the following screen:

The overall feeling of the installation procedure is that it was simple and relatively standard in comparison to earlier versions. The installation took me a while (around two and a half) but that was mainly because of a weak virtual machine with a slow external disk. When running the installation later on a regular database server, took me around an hour (which is about the same as earlier versions). When creating the instance using one of the predefined templates took around 10 minutes but I then needed to install relevant patches.
")


I am a beginner and i have started with oracle 12c on windows 8.1. i installed it correctly and when creating database using the DBCA i got a reply that the listener could not start. I earlier used the default listener on NETCA and could see on the command prompt that the listener could not start. Any help please.
What error do you get when you try to start the listener?
the error is in the command prompt that “listener start failed” that is when i create it using the NETCA command and when creating the database using the DBCA wizard in (step 7 of 15) the network configuration i get a pop-up window that “failed to start listener” and the listener status is down
try starting the listener manually (lsnrctl start). it will probably fail but you could see what is wrong there.
if you want, you can email me your screenshots and i’ll have a look
and with (lsnrctl start) it gives an error “unable to openCSmanager error=5
TNS-12560 : TNS: Protocol adapter error
TNS-00530 : protocol adapter error”
My listener starts but listener status doesnt show pluggable database. i get 12514 error when trying to connect from sql developer.